part-time4wd.com
  • Home
  • Blog
  • The Builds
  • tech
  • contact

progress on several fronts

8/6/2021

 
Progress has been made!

First up, i got my air-fuel ratio gauge installed.  I removed my a-pillar trim, removed the gauges, and removed my standalone harness for the gauges
Picture
Picture
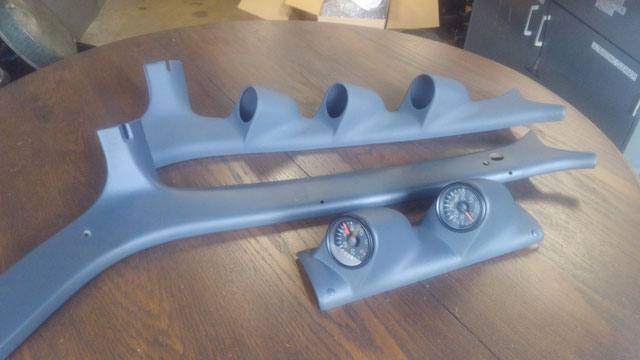
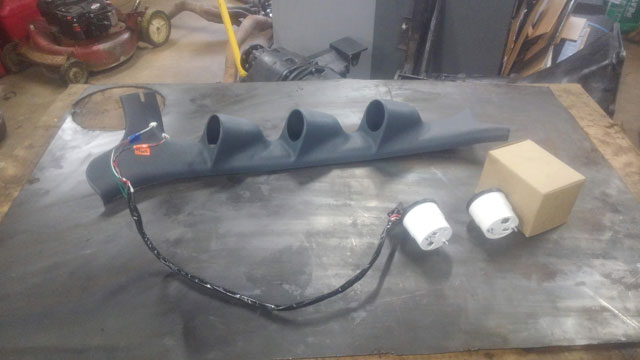
Wiring harness dissected, and A/F gauge wiring added!  Since its a gauge from NVU the wiring is basically the same.  So i spliced in the power, ground & illumination wires, and only had to add a single wire to the harness- the +5v reference from the wideband controller.  So overall a pretty easy job to do.
Picture
​Bam! installed.
Picture
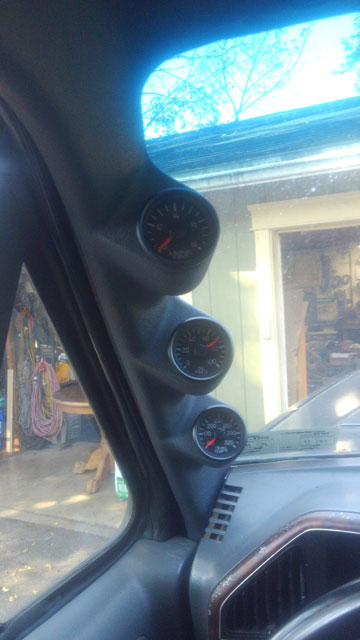
The Glowshift pod fits pretty good actually, but i did trim the top slightly where the windshield trim fits up against it, so it would fit a little tighter.  Just some minor work with a razor knife, nothing major.  I also took the time to lay out where the original trim screws go, so i could use the OEM screws to go thru both the pod & the pillar so no extra hardware to remove, and it actually looks pretty clean.
So, that's done, moving on.  I got my new ECU from Stinger Performance, the PimpX!
Picture
​It comes with a bunch of stuff, including a pretty in-depth 30-something page PDF, which i printed off for a reference since the wifi in my garage sucks.  They actually want you to open it up, so here we go!
Picture
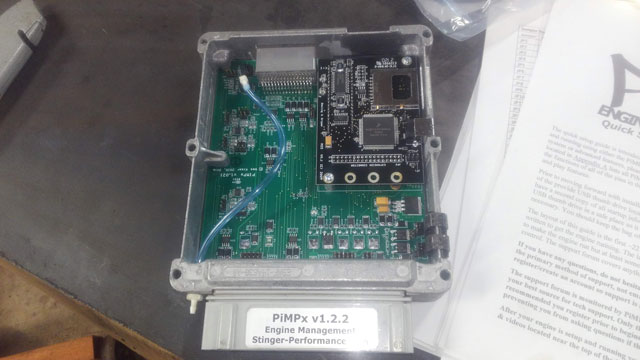
If youve ever been inside your ECM/PCM, then you know it looks nothing like this!  This is a 100% custom-built ECU based off the Megasquirt III.  It has a bunch of jumpers you need to install in the board to configure your unique setup.  They intentionally dont install any just so you have to go thru it and do it yourself, which i actually kinda like since it forces you to set it up exactly for your vehicle.  In my case, its only a couple jumpers since im still batch-fire, Speed Density, and running the stock TFI & ignition compnents.  It supports a ton of stuff like sequential EFI, coil-on plug, boost switches for forced induction, narrow or wideband O2 sensor(s),  it has its own electric fan controller....the list goes on.  Im still reading thru the PDF, but im pretty sure i know how im going to configure mine.
It uses its own built-in MAP sensor so i have to delete the OEM one, and run the supplied vacuum line from the intake right to the ECU.  Also, i am going to be using a wideband O2 in place of the factory narrowband (which gains me self-learning programming), which means i only needed 1 o2 bung in the exhaust, and i will have to tie the wideband controller's output into the oem signal wire from the original narrowband sensor.  I think this is the only modification i need to make to the wiring harness tho, everything else should just work like stock.  I still have more reading to do on this, so there will be more updates on this over the next couple weeks.
Heres the big one though:
Picture
​The motor is done!
All ive got to do is install the motor mounts & flexplate, and sometime next week she's going back in the bronco!


Comments are closed.

    Categories

    All
    203/205 Doubler
    3/4 Ton Conversion
    3g Alternator
    460
    5spd Swap
    88 Bronco
    90 Bronco
    96 Bronco
    96 F250
    Anti Wrap Bar
    AOAA
    Bed Liner
    Big Dogs Offroad
    Bilstein
    BW1356
    C6
    Dana 60
    Dump Bed
    E4OD
    East Coast Bronco Roundup
    ECBR
    Electric
    Electric Fan
    Explorer Seat Swap
    Fab Work
    Fender/carrier Repair
    Floor Vents
    Front Bumper
    Garage
    Gauges
    Half Cab Conversion
    Home Depot Bed
    Junkyard
    Junkyard Gems
    Kid Trax Bronco
    Leaf Sas
    Massey 3165
    Off Road
    On Board Air
    Pickup Cab Swap
    Pmgr Starter
    Rausch Creek
    Rear Bumper
    Recovery
    Rock Light
    Saginaw Swap
    SD Bumper Swap
    SD Spring Swap
    Shackle Reversal
    Sliders
    Sliding Windows
    Solid Axle Swap
    Steering Column
    Sterling 10.25
    Tire Carrier Repair
    TTB TRE Flip
    Video
    Water Injection
    ZF S5-42

    Archives

    June 2025
    February 2025
    January 2025
    December 2024
    November 2024
    September 2024
    August 2024
    July 2024
    June 2024
    May 2024
    April 2024
    March 2024
    February 2024
    January 2024
    December 2023
    November 2023
    September 2023
    August 2023
    July 2023
    June 2023
    May 2023
    April 2023
    March 2023
    February 2023
    January 2023
    December 2022
    November 2022
    October 2022
    September 2022
    August 2022
    July 2022
    June 2022
    May 2022
    April 2022
    March 2022
    February 2022
    January 2022
    December 2021
    November 2021
    October 2021
    September 2021
    August 2021
    July 2021
    June 2021
    May 2021
    April 2021
    March 2021
    February 2021
    January 2021
    December 2020
    November 2020
    October 2020
    September 2020
    August 2020
    July 2020
    June 2020
    April 2020
    March 2020
    February 2020
    November 2019
    October 2019
    September 2019
    August 2019
    June 2019
    May 2019
    April 2019
    March 2019
    February 2019
    January 2019
    December 2018
    October 2018
    August 2018
    July 2018
    June 2018
    May 2018
    April 2018
    March 2018
    February 2018
    December 2017
    November 2017
    October 2017
    September 2017
    August 2017
    June 2017
    May 2017
    April 2017
    March 2017
    February 2017
    January 2017
    December 2016
    November 2016
    October 2016
    August 2016
    May 2016
    June 2015
    February 2015
    July 2014
    June 2014
    February 2014
    August 2013
    July 2013
    June 2013
    May 2013
    April 2013
    June 2012
    May 2012
    March 2012
    February 2012
    January 2012
    September 2009
    June 2009
    March 2009
    July 2008
    April 2008
    March 2008

  • Home
  • Blog
  • The Builds
  • tech
  • contact